+86-755-88868631
4.9 GOOGLE RATING
+86-755-88868631
4.9 GOOGLE RATING
For the old advertising installation masters, this question can be avoided. Here is a reference for those friends who order LED letters light & LED luminous characters & Led Light Letters online.

I have written an article before and mentioned that there are two types of luminous character production and processing factories. One is the self-owned processing factory, which mainly serves customers with high brand or quality requirements, and the other is the peer processing factory, which mainly serves advertising stores and advertising companies. Since there are quite a lot of luminous characters, the self-owned processing factories use relatively good materials. The luminous character factories that do second-hand processing generally process borderless characters, super characters, 3D characters, stainless steel buckle-edged luminous characters, neon characters, etc. Most of the stainless steel buckle-edged characters are mirror steel buckle-edged or brushed buckle-edged. Due to environmental protection issues, their painting costs are relatively high, so they do not mainly promote luminous characters with painted edges; most of the materials are mainly aluminum edge strips or mirror steel edge strips.
Whether it is Alibaba, Global Sources, Made in China, or the luminous character processing manufacturers seen on Facebook and Google, the characters ordered from them are generally not installed. They are shipped upon payment, and need to be installed by yourself after the goods arrive. So here is a reference for this kind of friends on how to install luminous characters or how to wire luminous characters.
First, 1. The luminous character processing factory will provide a draft, that is, a 1:1 draft of the luminous characters; after receiving the goods, you must not throw it away or damage it as garbage. First open the installation draft received and compare it one by one. This step is called draft comparison in the industry. The production workers also use this drawing to compare the draft in the factory, so when installing, the installers also need to use this drawing to compare the draft to see if there are any omissions. If there are any, immediately feedback to the manufacturer’s customer service.
Secondly, 2. The installation master needs to have a little knowledge of electricity, and it is best to be a master with an electrician certificate; after comparing the draft, test each character one by one with a special LED power supply to check whether the luminescence of the character is good. Make sure that every stroke of the luminous character is bright. Note that when testing the light, the 220V line must be connected to the 220V position of the power supply, and the luminous characters are connected to the positive and negative poles of the power supply.
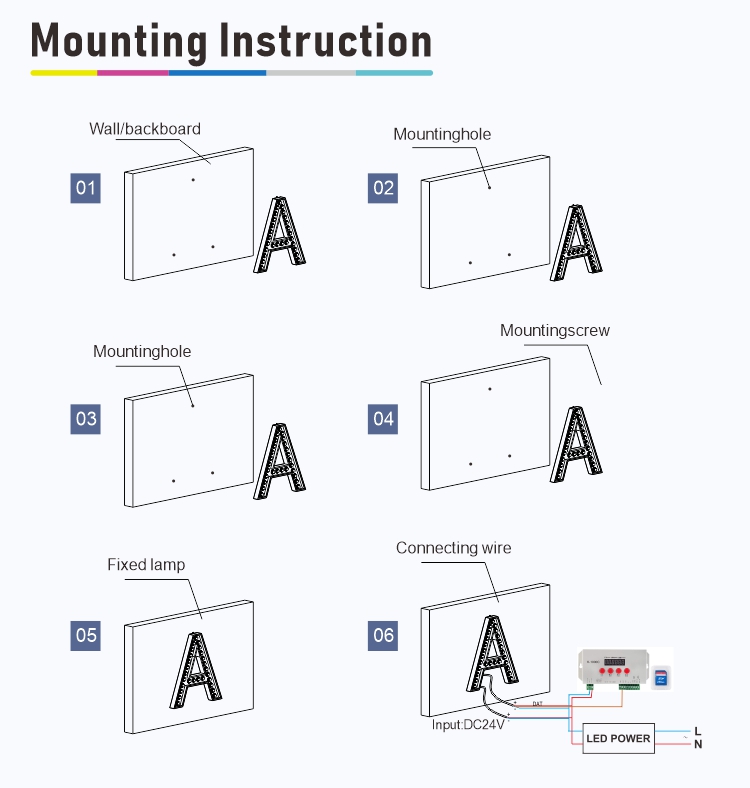
Step 3 After confirming that the luminous characters are intact and powered on, place the installation draft in the center of the door head or background board where they need to be installed. Fix it with color separation paper. Stand below and visually check whether it is the position you need to install. If you have professional tools, such as a level ruler or a laser ruler, check the level. If conditions do not allow, you can only look at your own aesthetics.
Step 4, fix the LED luminous characters. If the characters bought online are small and light, you can use glass glue or structural glue. Generally, transparent neutral glue is better. If the characters are slightly smaller, you need to use hot melt glue to assist in fixing. Of course, before gluing, you have to put the strokes of the characters through and hide them on the back.

Step 5, after all the characters are fixed according to the font draft, the heavy part is the wiring work behind the backboard. This step stumps many people. If your backboard is quite narrow, it is a bit difficult to put your hand in. In this case, you need to first pass the positive and negative wires of the wire through the hole, and mark which stroke it is. After fixing the characters, connect the whole thing and put it in. This work is very hard and meticulous.
Step 6, connect the LED power supply. The two wires behind each stroke of the LED luminous characters are positive and negative. It is to connect the positive and negative poles of the LED power supply. If there are fewer characters, one or two power supplies can handle the characters, and I believe everyone can connect them directly with their eyes closed, but what if there are multiple LED power supplies? This will test the master’s allocation ability and professional knowledge. If there are more than 3 power supplies, you still have to find a professional. If you do it yourself, the distribution is still uneven, which will cause the brightness of the characters and strokes to be inconsistent.
Step 7, the power interface has 220V neutral wire, live wire, and ground wire; connect them to the neutral, live, and ground wires that are right in the main line position, and send electricity.
It seems that the description is very simple. Now the professional installer of LED luminous characters has also gained experience through constant exploration, especially when dividing the wires, whether the old master or the new master can tell by looking at the handwork. If it is installed by a novice, the power supply and lamp may burn out easily in the later stage; if it is installed by an experienced person, as long as the power supply is reasonably distributed and the load is normal, the power supply will not break down in less than a year. If the power supply is of good quality, it will not break down for more than two years.
